By PJ Delohomme
Why Zero at 100 Yards
Zeroing your rifle is one of the most critical steps for achieving accuracy in shooting sports and hunting. While the 100-yard zero is widely accepted, many shooters wonder why this distance is considered the standard. This article explores the reasons behind the 100-yard zero, its advantages, and how to adapt it to your specific shooting needs.
Parallax Adjustment Is Typically Set at 100 Yards
Parallax is an optical effect caused by the bending of light through a rifle scope’s lenses, which can make the crosshairs appear off-center relative to the target. Most scope manufacturers set their parallax adjustment to 100 yards by default, ensuring that the reticle stays aligned with the target at this distance regardless of head movement.
To visualize parallax, hold a pair of safety glasses at arm’s length and look at a corner of a building or door frame. The edge appears “broken” due to the curve of the lens. As you rotate the glasses slightly, this distortion becomes magnified—this is parallax.
Parallax error is eliminated when shooting at 100 yards with a scope set to this distance. However, some rimfire scopes are adjusted to 50 yards, so always check your scope’s specifications before zeroing.
Detect Misalignment Between Scope and Bore
Zeroing at 100 yards helps identify alignment issues between your scope and rifle bore. At shorter distances, misalignment may not be noticeable, but at 100 yards, improper alignment will result in a significant deviation from your point of aim. If you run out of windage or elevation adjustments while zeroing, consult a gunsmith to resolve the issue.
Practical for Hunting and Shooting Scenarios
The 100-yard zero serves as an effective baseline for most calibers and shooting situations. It simplifies trajectory calculations for medium-range shots while allowing flexibility for adjustments at longer distances. For instance, if you’re heading to Wyoming for a mule deer hunt with shots up to 300 yards, a 100-yard zero may result in excessive bullet drop. Depending on the caliber, bullet drop could be 13 inches or more. Many of today’s scopes feature adjustable turrets that can be dialed for any given range. Once the dial is set, place the crosshairs on the target, and squeeze.
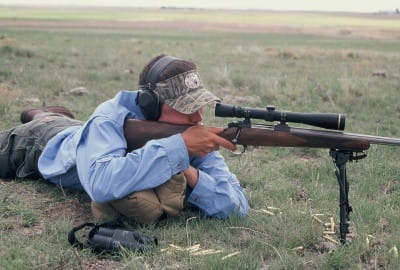
How to Zero Your Rifle Effectively
- Set Up Your Target: Place a target at your chosen distance (100 yards). Use a stable bench rest or bipod.
- Adjust Scope Settings: Ensure windage and elevation settings are centered before starting. Be sure that your scope is mounted correctly.
- Fire a Group: Shoot three rounds and observe their point of impact.
- Make Adjustments: Use scope turrets to align the point of impact with your point of aim.
- Repeat Until Zeroed: Continue firing groups and adjusting until consistent accuracy is achieved.
Adapting Your Zero for Different Distances
While 100 yards is standard, alternative zero distances may suit specific needs. A 50-yard zero is ideal for rimfire rifles or carbines used in dense terrain with limited long-range shots. A 200-yard zero provides a flatter trajectory for large game hunting out to 300 yards without significant holdover. If you really want to push it, a 250-yard zero is great for long-range shooting scenarios. Keep in mind, though, that at longer distances, more variables like wind speed and temperature come into play.
To shoot long distances, new tech (and knowing how to use it) is key. There is an ever-evolving market of ballistics calculators and apps like Hornady Ballistics and Applied Ballistics. It’s fine to push your limits at the shooting range, but when you start shooting at live animals, you owe it to your quarry to know your effective range.